WiFi CCTV Camera Installation Guide – Signal & Placement Tips for Bangalore
WiFi CCTV cameras are exploding in popularity across Bangalore—especially in apartments, rental homes, and small shops. They’re affordable, quick to install, and packed with smart features. But there’s a catch:
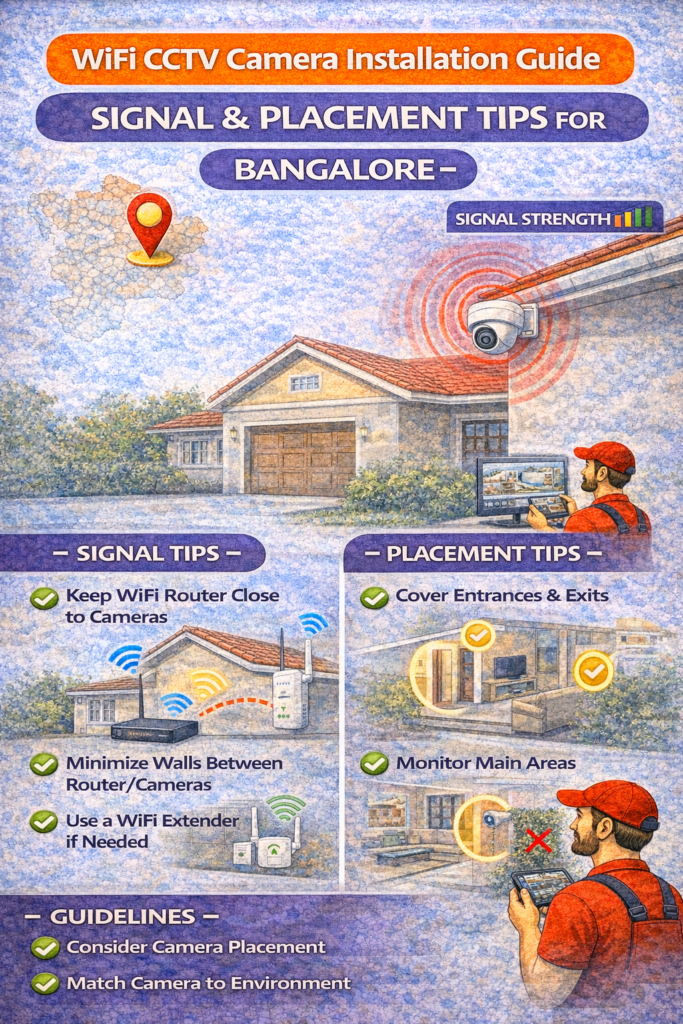
Most WiFi CCTV problems are not camera problems—they’re signal and placement problems.
If your WiFi camera:
Goes offline randomly
Lags during live view
Misses motion alerts
Shows blurry or frozen video
…the installation wasn’t planned properly.
This guide explains exactly how to install WiFi CCTV cameras the right way, with signal-strength logic, placement rules, and Bangalore-specific tips—so your camera works reliably, not just initially.
What Is a WiFi CCTV Camera?
A WiFi CCTV camera:
Connects to your home router wirelessly
Uses mobile apps for viewing
Stores footage on SD card or cloud
Requires stable internet + power
It does not eliminate the need for planning.
When WiFi CCTV Is the Right Choice
WiFi cameras are ideal if you:
✅ Live in a rented house ✅ Want quick installation ✅ Need 1–3 cameras only ✅ Mostly monitor indoor areas ✅ Want mobile alerts & cloud access
WiFi CCTV is not ideal for: ❌ Large villas ❌ Outdoor long-distance coverage ❌ Unstable internet zones
Pre-Installation Checklist (Do This First)
Before mounting the camera, confirm:
☑ Strong WiFi signal at camera location ☑ 2.4GHz WiFi enabled on router ☑ Stable power socket nearby ☑ Camera firmware updated ☑ Mobile app installed & tested
Skipping this step causes 90% of WiFi CCTV failures.
Understanding WiFi Signal Strength (Simple Explanation)
WiFi cameras need:
Signal strength ≥ -60 dBm (ideal)
Minimal interference
Stable upload speed
Common Signal Killers in Bangalore Homes
Concrete walls
Metal doors
Elevators
Inverters & appliances
Multiple routers in apartments
👉 Distance matters more than internet speed.
Best WiFi Router Placement (Very Important)
Ideal Router Placement
Central location
Elevated position (not floor level)
Open area (not inside cupboards)
Away from thick walls
Bad Router Placement
❌ Near fridge ❌ Inside metal racks ❌ Behind TV unit ❌ Near inverter
Fixing router placement alone solves many CCTV issues.
Step-by-Step WiFi CCTV Camera Installation
STEP 1: Connect Camera Near Router (Temporary)
Power ON camera
Keep it within 5–8 feet of router
Complete initial setup via mobile app
This ensures:
Stable pairing
Firmware updates
Proper account linking
STEP 2: Connect to 2.4GHz WiFi
Most WiFi CCTV cameras:
Do not support 5GHz
Work best on 2.4GHz
Router settings:
Enable dual band
Rename 2.4GHz separately if needed
STEP 3: Test Live View & Alerts
Before final mounting:
Check live feed stability
Trigger motion alerts
Test playback
If it fails here, do not mount yet.
STEP 4: Final Camera Placement (Critical)
Ideal Placement Height
Indoor: 7–9 feet
Outdoor (covered): 9–10 feet
Best Angles
Tilt slightly downward
Avoid direct light sources
Avoid reflective surfaces
Best Placement Areas for WiFi Cameras
Apartments / Homes
Main door (inside-facing)
Living room
Corridor
Kids’ play area (optional)
Small Shops
Entry
Cash counter
Storage corner
Avoid: ❌ Bedrooms ❌ Bathrooms ❌ Direct neighbor view
Indoor vs Outdoor WiFi Cameras (Know the Limit)
Indoor WiFi Cameras
Stronger signal
Stable performance
Cleaner footage
Outdoor WiFi Cameras
Require:
Weatherproof casing
Strong signal
Closer router distance
Highly sensitive to interference
👉 Outdoor WiFi cameras work only for short ranges.
How Far Can a WiFi CCTV Camera Work?
Realistic ranges (Bangalore apartments):
Same room: Excellent
1 wall gap: Good
2 thick walls: Unstable
3+ walls: Not recommended
Solution:
WiFi extender / mesh system
Move router closer
Use wired CCTV instead
WiFi Extenders & Mesh – Do They Help?
WiFi Extender
Extends signal range
Can introduce lag
Budget solution
Mesh WiFi
Best solution
Seamless coverage
Expensive but reliable
For multiple cameras, mesh WiFi is worth it.
Power Backup for WiFi Cameras
WiFi cameras stop recording during power cuts.
Solutions:
Connect router to UPS
Use inverter-backed power socket
Some cameras support battery backup
No power = no WiFi = no recording.
Common WiFi CCTV Problems & Fixes
Camera Goes Offline
Fix:
Restart router
Improve signal
Reposition camera
Lagging or Buffering Video
Fix:
Reduce live view quality
Improve upload speed
Reduce number of connected devices
Motion Alerts Not Working
Fix:
Adjust sensitivity
Check detection zone
Allow app notifications
SD Card Not Recording
Fix:
Format SD card
Use high-endurance card
Avoid cheap memory cards
Security Tips for WiFi CCTV Cameras
Very important in 2026:
✅ Change default passwords ✅ Enable two-factor authentication ✅ Update firmware ✅ Avoid public WiFi access ✅ Secure your router
Never share:
QR code screenshots
Device IDs
Admin passwords
WiFi CCTV vs Wired CCTV – Final Reality Check
WiFi CCTV
Wired CCTV
Easy install
Professional setup
Internet dependent
Works offline
Best for 1–3 cams
Best for 4+ cams
Rental-friendly
Permanent
Choose WiFi for convenience, wired for reliability.
FAQs – WiFi CCTV Installation
No. Internet is required for viewing & alerts.
Yes, if secured properly.
2–4 comfortably. More needs mesh.
Only if power backup exists.
Final Takeaway
WiFi CCTV cameras are powerful—but only when signal and placement are planned properly.
Most people blame the camera. The real issue is WiFi physics.